Instructions
Flash Presentation Object
The package consists of a non-editable Flash movie file and an editable xml (extensible markup language) document file. The Flash file is named presentation.swf and the xml file is named demo.xml. An HTML file (index.html) and a JavaScript file (AC_RunActiveContent.js) are also provided with which to deploy the final presentation. All the files are downlloaded in a Windows .zip file.
You have to extract the files into a separate folder to run and edit the software.
The HTML file is named index.html so that it can be the root file of a directory in a website. It can be renamed to any other name but the other three files should keep their default filenames. All four should be uploaded to your website in the same directory. When the HTML file runs it reads the contents of the xml file.
The software can also be run offline in a laptop or desktop computer that has the Flash plugin installed by simply double clicking the index.html or the Presentation.swf file.
Also provided is a set of image files in a subfolder called Images. These are used to demonstrate the software and should be replaced with your own image files. The complete Images folder should also be uploaded to your website along with the other four files.
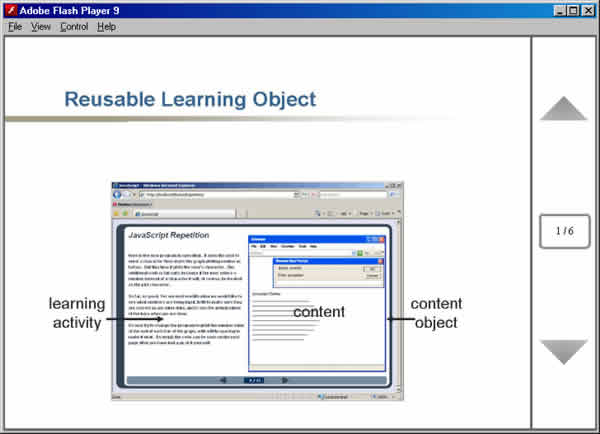
The Flash presentation is a simple backwards and forwards navigator that runs through a series of slides, or pages. It is essentially a linear slideshow. The opening page looks something like like the figure below. This, and all the other pages, can be edited by replacing the images. Any number of pages can be included.
In either deployment mode, the presentation.swf file runs and reads the demo.xml file to load its content. So you can edit the content by editing the xml file in any text editor such as Word, Wordpad or Notepad++. This means you do not need to have your own version of Flash and you do not have to know how to use Flash. All you have to do is edit a text file. In Microsoft Word. This looks like the figure below.
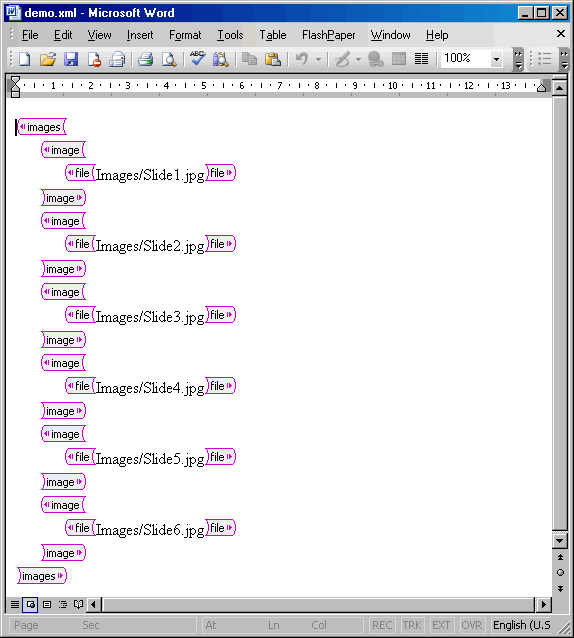
The whole document is contained within two tags. One is the opening tag, <images> and at the end is the closing tag </images>. Between these two tags is a series of <image> </image> tag pairs which define the images contained in the presentation. Each has only one further entry which is another tag pair, <file></file> which encloses the name and location of each image file. In the example given, the first image is Images/Slide1.jpg. This refers to the Images subfolder and the Slide1.jpg file contained in it. You can edit these image file names and put your images anywhere you like as long as you enter the correct location.
New images can be added and old ones deleted from the xml document but with care. To add an image, copy and paste a complete previous image, including the <image> </image> tags then edit its file name. Then the document should be saved as an xml file, called demo.xml. If you then run the presentation.swf file by double clicking, it will read this xml file and display its contents. And, of course you can repeat the editing procedure as often as you need to get it right. You can also use the same template for other courses and presentations.
There are some restrictions on the images you can use. They have to be jpeg or gif images. Some versions of gif do not work very well in which case they should be replaced by jpeg images. Also, the images can be different sizes but all of them should be at least 640 by 480 pixels to avoid pixelation - but not too large or download times will be increased. Whatever size you use it should have an aspect ratio of 4:3 to avoid distortion. For security reasons it is not normally possible to download images directly from a website except the one from which the Presentation.swf file is delivered, that is, your own site.
How to create your graphic images
Digital camera.
Photograph a scene, or a picture or a drawing on paper (for example, of mathematical formulae) in the usual landscape mode at 640 by 480 pixel resolution or greater. Copy this to your computer and save it in the correct folder. Usually this is a jpg file.
Powerpoint
You can use Save As to save the slides of a PowerPoint presentation as jpg or gif files. These are usually saved as Slide1.jpg, Slide2.jpd and so on, in a separate subfolder. You can use the Page Setup option to set the page size to custom then experiment with the sizes to get a 640 by 480 image file or just use the default size. You must retain the 4/3 aspect ratio so, for example, a size of 16.93 by 12.7 works. You can usually save a whole series of slides and just use the default subfolder/file names in your xml document.
Graphics software
Other graphics packages can be used to obtain images of 640 by 480 pixels and saved as a jpg or gif file.
Internet images
You can download free images from many web sites and save them in your folder. Again they should be at least 640 by 480 pixels. Note, however, that you must be sure they are not copyright protected.
Web pages
Provided you do not infringe copyrights you can save whole web pages. While viewing the page you can click on Alt-PrintScrn to save the whole window to your clipboard. Then you can paste the image into any graphics package and save it from there as a jpg file. Only static pages will be saved in this way. Animations, Java applets and Flash movies will not function in the copy.
How to change the background colour
The example given has a dark blue background. This is specified in the index.html file. It occurs four times, as the hexadecimal number #000044. You can edit this number to change the colour as long as you are careful not to change anything else. The best procedure is to keep a copy of the original before editing so that you can revert to that if things go wrong.
The numbers indicate the red, green and blue components of the page and Flash backgrounds. So #000000 is black, #FFFFFF is white, #FF0000 is brightest red, #00FF00 brightest green, #0000FF brightest blue and the #000044 used is a darker shade of blue. The numbers are not case sensitive and upper case Fs are used here only for clarity.