Flash Builder
Bill Tait Nov 2011
Flash Builder
When you run Flash Builder you will see that its display consists of a set of window panes, or views. It has a Package Explorer view in the top left corner, an Outline view bottom left, a Problems view bottom right and a workspace in the top right corner. There is also the familiar Windows menu bar along the top and below that a typical toolbar with a range of the more frequently used options.
The workspace pane is where you will write your programs but initially it contains a “Start Page” with some links to Flex learning materials. You can click on these to learn more about Flash Builder but they will give you more information than you really need at this stage.
At the top of the workspace there is a tag with the page name and the familiar Windows closing X in the corner. Click this X to close the Start Page and you are left with a blank space. You can get it back at any later time through the Help/Flash Builder Start Page option.
Once you have got going with Flash Builder you will probably have several programs loaded at the same time and you can edit any of them. The scene will be similar to the example shown in Figure 1.
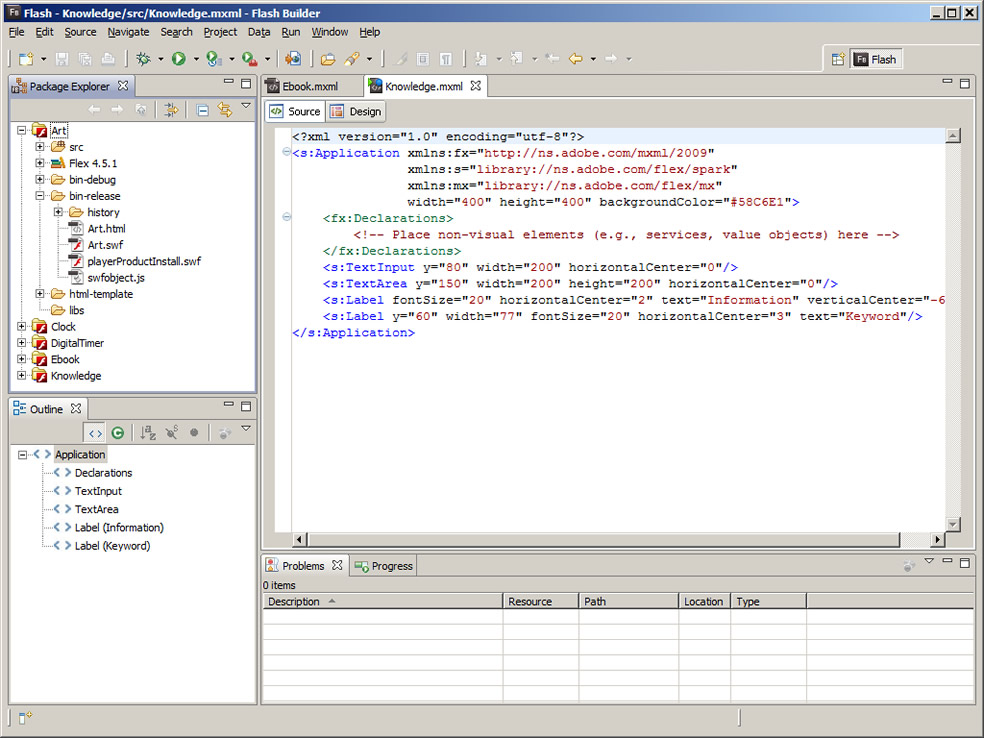
Figure 1. A typical Flash Builder window.
Projects
Modern software applications are developed as projects. A project is usually a folder that contains the program file and all the other resource files it needs to execute. The folder is usually named after the application. In Flash Builder, the resource files would include at least an HTML web page to hold the Flash application, the Flash application file itself, which has an extension .swf, and possibly some other files, such as image files. For each application you create, Flash Builder creates a new project folder along with all the other files associated with the development and deployment of the application. As you develop the application these files are kept up to date.
To create a new project, open the File menu, select New, then Flex Project. This will open a popup window as illustrated in Figure 2. You can enter the name Starter in the Project name box (to create an application called Starter.swf) then accept the default settings for all of the other options and just click on the Finish button to complete the process.
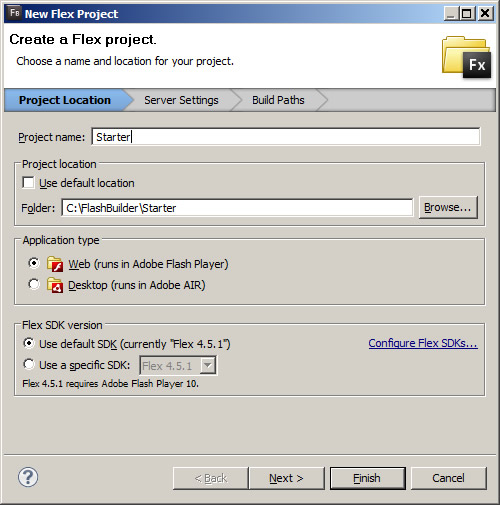
Figure 2. Creating a new project.
This will save your project in a folder somewhere in your Documents folder, such as
C:\Users\Bill\Adobe Flash Builder 4.5\Starter
You are now returned to the workspace which contains some starting source code for your program. Also, the Package Explorer shows the files that have been created, the Outline view shows an outline of your source code and the Problem view should be empty since you have not yet experienced any problems.
If you look inside the Starter folder it will have a number of subfolders. The most important of these are the src folder, which contains your source code file, Starter.mxml which is actually your program. The other important folder is bin-debug which contains the Flash application file, Starter.swf, and an HTML web page file, Starter.html, to hold the Flash file. This is not the final version of your web page but only one that is used to display your application for development and debugging purposes. The same folder structure can be seen and explored inside Flash Builder in the Package Explorer view.
Saving and Reloading a Project
Flash applications are developed like most software in a series of iterations, progressively writing code and testing it for errors (debugging) before reaching the final version. This means a project usually has to be saved then reloaded at a later time to continue the development process.
IIn Flash Builder, project folders and their contents are displayed in the Package Explorer pane and you can have several projects open at the same time. So you don't really need to save and reload them during application development. All you have to do to work on some other project is close the application tab on the workspace to clear it.
However, if you do want to completely remove a project and reinstate it later you simply delete it from the Package Explorer pane. Right click on the project name then select Delete and, importantly, select the "do not delete contents" option in the popup window. This leaves the whole project folder intact in memory but removes it from Flash Builder.
You can reinstate the project from the File menu, Import Flash Builder Project option. Then select the Project Folder option and browse to the folder, that is, the project, you want to reinstate in Flash Builder. This adds the folder to the Package Explorer.
To open a project that has been reinstated or just deleted from the workspace you have to click the + box against the project name, then similarly open the src folder and the Default Package folder and double click the mxml file. This opens the file in the workspace for editing.
Source and Design Perspectives
You will see that there are two tags at the top of the workspace, one labelled Source, and the other, Design. These represent two ways of developing applications. Currently the Source mode is selected, and shows the program source code, but if you click on the Design tag a new perspective is displayed on the screen. Essentially this replaces the code workspace with a blank window. This is what the source code would produce if it is compiled into a Flash application right now. So the design perspective allows applications to be developed in WYSIWYG mode, that is, “what you see is what you get”.
The Design screen has the same Package Explorer, Outline and Problem views as the Source screen. However, the workspace is quite different and the Outline view now shows a list of Flex Components. Also, some new views have appeared down the right hand side of the IDE, mainly in the form of a Properties pane.
This screen is used to construct a program by dragging components from the Component list onto the window and arranging them as you want them to be displayed in your application. Their properties are then edited in the Properties pane to generate application source code that can be viewed in the Source perspective.
Source Code
There are two programming languages in Flex, called MXML and Actionscript. Essentially, MXML is used to create the user interface and Actionscript is used to prescribe the behaviour of the application. Here we are creating the user interface - actually a Graphical User Interface, or GUI, so we are using MXML.
MXML is illustrated in other tutorials but, for the present, it is the Flex version of XML, the eXtended Markup Language that is widely used to model application content. Here it is being used to model the content of a GUI. It is based on specially defined Flex XML tags which define the components of the interface in much the same way that HTML, or XHTML defines the content of a web page. XML represents data as a hierarchical structure of tags and in MXML these tags represent Flex program components.
The MXML code is saved as a file with the extension mxml and converted to a Flash application by running it through the Flex compiler. This converts the MXML to a compiled file with the swf filename extension. This swf file is the Flash application.
When a new project is created, the shell MXML code is already written in the program file. This may vary from one case to another. Typically, it is as follows:-
<?xml version="1.0" encoding="utf-8"?>
<s:Application xmlns:fx="http://ns.adobe.com/mxml/2009"
xmlns:s="library://ns.adobe.com/flex/spark"
xmlns:mx="library://ns.adobe.com/flex/mx"
minWidth="955" minHeight="600">
<fx:Declarations>
<!-- Place non-visual elements here -->
</fx:Declarations>
</s:Application>
The first line declares the version of XML that is to be used. It is always the same and, in fact, if it is omitted the Flex compiler will assume the default version with no ill effects. However, it is best to include it as a “future-proof” formality.
The next line opens an Application tag with <s:Application then defines a number of terms, known as attributes, before closing with the > bracket. This tag, from the < to the > is an opening tag. The closing tag is the </s:Application> at the end of the program with the s preceded by a forward slash.
You might notice that the attributes of the Application tag are all expressed in the form of name and value pairs, with the values in quotation marks. For example, the minimum width of the application is expressed as minWidth=”955”. Everything between the opening and closing Application tags defines the content of the Application component, which is the actual application. Again, the format is a bit like the web pages that open with <HTML> and close with </HTML>.
The only content in this blank application is another pair of tags, <fx:Declarations> and the closing </fx:Declarations> again with no content except an XML comment. This starts with <!--- and ends with -->, exactly like HTML. This comment is only intended to provide information for a reader and is not compiled by Flex. In any case, we will not be using the Declaration tags or the comment so you can delete them or just ignore them.
What we have to do now is to write the code for our user interface by adding more MXML tags and their attributes between the opening and closing Application tags - and after the Declaration tags if they are still there. Each of these new tags will represent a Flex component, usually an element of the user interface.
Or we can make life easier and switch to Design mode.
Design Mode
The Design screen shows the application window as it would appear with the existing MXML code. So currently it is blank. The available Flex components that you can add to your program are listed in the Components view. We can drag and drop any of these into the window then resize and relocate them as required. For example, if we press the mouse button over the Label component (you will have to scroll down the list for this) then drag it and drop it onto the window, an MXML label is created. Initially it is enclosed in a blue box with handles showing that it is selected. You can drag the whole label to move it or drag on one of the handles to resize and reshape it.
Meanwhile the views on the right of the design perspective show the current properties of the Label component. If you deselect the Label by clicking somewhere else on the window, the properties shown are those of the Application, which is the background component. Clicking the Label again reselects it and shows its properties. On the same pane, next to the Properties tag, is an Appearance tag. Clicking this reveals some further visual properties of the selected component.
One change that would be very useful at this point is to increase the size of the Label, since it is very small. So you can scroll down the properties view and change the text size from the default, which is probably 12, to 30. This immediately enlarges the label.
If we now switch back to the Source screen we see that a Label tag has been inserted into the MXML code, as follows:-
<s:Label x="218" y="153" fontSize=”30” text="My Starter Flash application "/>
This is another form of tag structure that combines its opening and closing tags - opening with <s: and closing with /> so that it is entirely self contained. This is convenient when there are no other tags to be contained.
The tag defines a Label component at x- position 218 and y position 153, both measured in pixels from the top left corner of the window (like text). It also has a font size of 30 and a text value of “Label” which is the text that is displayed on the Label. These correspond to the values displayed in the Properties view of the Design screen.
And incidentally, the Application properties show minWidth and minHeight properties that are also part of the Application tag. In this example, they happen to be set at 955 and 600, which, I suppose, is a convenient web page size but very large window for such a small application. They may be set to different values on your version.
Compiling the Application
However you choose to produce your MXML code file, it eventually has to be converted into a deployable Flash application. You have to compile the mxml file to a swf file with the Flex compiler. In the process you are likely to discover coding errors, or bugs, in your program which have to be corrected so you usually have to repeat the process a few times. These errors will show up in the Problems view.
Flash Builder integrates all of these functions into a Run process which compiles and deploys the swf in its own built-in browser. This allows the application to be tested and debugged all inside the IDE. When a bug-free application has been produced that functions as it is supposed to, the final swf file can be generated as a release version that does not have the debugging code included.
You can test the process for the simple Starter application. It is initiated by clicking on the Run item in the Run menu, or just clicking directly on Run button in the toolbar. It is the green circle with the right pointing arrow head. You get a small popup window. We don’t really want to see this every time and we do always want to save our resources, so we can check the checkbox before clicking OK.
Then after a short delay, the application window opens and displays the application file, Starter.swf, in a web page Starte.html in the Flex browser.
All you have to do now is copy the starter.swf file into the folder where you have saved your web page and upload both to your web server.
Deploying the Application
Deployment involves writing a web page, inserting the object tag for the Flash swf file and uploading the page and the swf file to your website. Flash Builder will write the page for you and insert the object code. It will also add some code to prompt a user to download the Flash player if it is not already installed in the browser. Then it will save the swf and other required files in a bin-release subfolder of the project folder.
Now you only have to open the Project menu and select Export Release Build and click Finish to create the release build of the swf file in a new project subfolder called bin-release. This contains the swf file, in this case Starter.swf, and an html file as well as another swf and a JavaScript file to look after the browsers with no Flash player installed. All you have to do now is edit the html file and upload all the files to your website.
Alternatively you can copy the swf file into another folder and develop an html file in that. This should contain and object tage of the form
<object classid="clsid:D27CDB6E-AE6D-11cf-96B8-444553540000" width="400" height="400">
<param name="movie" value="Starter.swf" />
<param name="quality" value="high" />
<embed src="Starter.swf" quality="high" width="400" height="400"></embed>
</object>
which will deploy the swf in the web page without any other swf files or JavaScript.
Starter.swf is not a very interesting application but is serves to get you started with Flash Builder. To produce more interesting applications you need to learn some Flex programming. Tutorials will be provided in Webtutor Technology that provide better examples.